


NOTE: Before you start your Reiki Leval 1 (One) Training, It is important to know the History of Reiki. Check this article, History of Reiki – A Complete Guide. If you are attuned to Reiki Level 1 then only you will be able to heal yourself and others. If you are still not attuned to Reiki Level 1 (One) then you can join our Reiki Classes in Rishikesh, Classes are also available in Delhi and Online.
Preparing to Perform A Reiki Treatment on Self or Others
Before performing a treatment it is helpful if you take time to relax and get a clear picture in your mind of what your intention will be. The following tips will help you to accomplish this but if you don’t have time to utilize these tips don’t despair for the intelligence behind Reiki will not let you down.
Self-Hygiene: If you have time take a shower or bath prior to giving a treatment. If you don’t have time simply wash your hands with cool water. Doing this will help firmly establish in your mind the intention for treatment.
Set the Detached Intention to Heal: Call upon Reiki, in a non-demanding way, that it is your idea (intention) to provide Reiki healing either to yourself or the person you are treating. Once said let it go and don’t dwell on this thought any longer.
Grounding yourself and the Client: You will first ground yourself and then your client. To ground yourself all you need do is think that it is so and it will be. The grounding process could be simply imagining a line connecting your Crown down through your body to your feet and finally into the center of the earth. You need only spend about 10 seconds on this.
To ground your client simply place your hands on their shoulders (for distant healings do it in your imagination as if they were in the same room as yourself) with the intention of grounding them. Before you start, I’ll suggest you read this detailed article, Grounding in Reiki – Method & Benefits.
Performing a Treatment
Reiki, a hands on healing modality, is typically performed by placing the hands on yourself or another with slight pressure or no pressure at all. Prior to placing the hands on the person show them what hand placement positions you will be using and get their permission to do so prior to actually placing the hands on them. I say this because some people may find some of the hand placement positions offensive and may not want to be touched in such a manner. Should this be the case then simply hold the hands a few inches above the body part in question with no physical contact.
How to hold the hands – Reiki Level 1 Training
While performing Reiki it is important to hold yourself in a relaxed tension-free manner because tension seems to restrict the flow of Reiki. Also, with the palms open, be sure that no gaps exist between the fingers and the thumb of each hand In other words the fingers of each hand need to be touching one another.
Self Healing with Reiki
- Wash hands.
- Get into a comfortable position. It is usually easier to lie down while giving yourself Reiki, but you can do it sitting comfortably in a chair with your back erect and feet uncrossed.
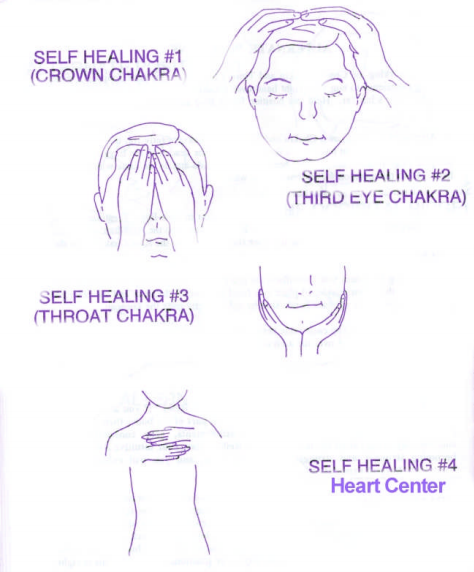
- Place middle fingers of both hands at the top of the head. Then, gently move your hands down until the heals of the hands touch the tops of your ears. Hold this position for 3 minutes.
- This position may be accessed in one of three ways: a) place hands with fingers pointing upward at the back of the base of your head; b) place your hands parallel, one above the other at the base of your head and neck; c) interlace your fingers at the base of your head. Hold this position for 3 minutes.
- Place your hands over your eyes, with your fingertips covering your Third Eye Chakra and your hands touching. Hold this position for 3 minutes.
- Cup your hands, with the heels of your hands touching, around your Throat Chakra. Hold this position for 3 minutes.
- Place your hands together, one below the other, over your Universal Love and Teaching Chakra so that the thumb of your right hand is touching the baby finger of your left hand. Hold this position for 3 minutes.
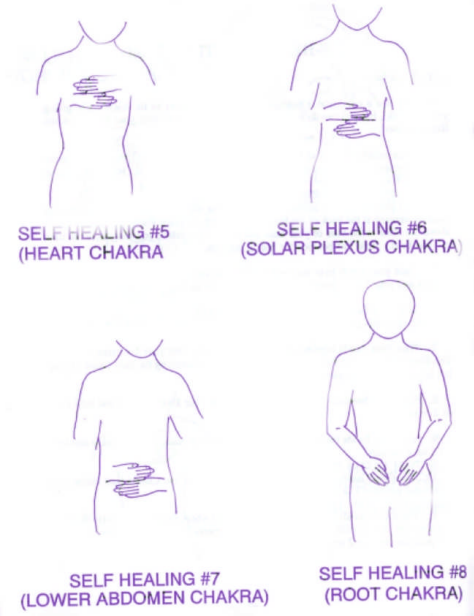
- Place your hands the same way as in #7 over your Heart Chakra and hold for 3 minutes. 9. Place your hands the same way as in #7 over your Solar Plexus Chakra and hold for 3 minutes.
- Place your hands the same way as in #7 over your 2nd Chakra (just below your navel) and hold for 3 minutes.
- Place your hands in a “VEE” (the right hand where the right leg meets the trunk of your body, and the left hand where the left leg meets the trunk of your body). Hold this position for 3 minutes.
- If there are any particular areas on your body that need attention, follow your intuitive abilities with regard to your hand placement. Remember, Reiki goes where it needs to go. As long as you cover all of your chakras, you can feel confident that any extremities are also being taken care of.
- That’s it! You can now meditate, relax for a few minutes or do whatever you wish.


NOTE: The above 9 self-healing positions are ONLY a minimum number of exercises you are required to do. You can, if you like, incorporate more exercises from other sources if you like to but it is not necessary to do so. The choice is yours but whatever you decide to do make sure you do AS A MINIMUM the above 9 hand placement positions. The reason why ONLY 9 positions whereas other Reiki Masters suggest more is that these 9, it is believed, affect the MAJOR charkas which in turn will influence the other areas that the other exercises (NOT SHOWN HERE) affect.
Ethical Considerations For Reiki Treatments
Aside from actively working on self-healing to augment your ability to serve the client as an effective and pure channel of Reiki, these guidelines for ethical conduct should be followed. They are common to most professional Reiki organizations.
- Always get permission to treat.
- Treat the client with respect and vow to maintain that any and all information about a client and their treatment as confidential.
- Provide a safe and supportive environment for the client.
- Do not promise any particular outcome or cure. Describe Reiki as a relaxing and balancing energy treatment that promotes healing and compliments but does not replace traditional medical care.
- Before an initial session, inform a client (in writing and orally) about a Reiki session and what it entails. Inform also of the potential detoxification or cleansing effects that an energy balancing modality can have. Explain that some people experience some discomfort after and even during treatments if their body begins to heal aggressively. Recommend that a medical doctor be consulted, should anything become very uncomfortable or persist for more than a couple of days.
- Do not request that a client disrobe (unless appropriate, legal, and in the context of a procedure that requires it e.g., licensed message therapy session); clothing can stay because Reiki penetrates clothing. In fact, a client can place a blanket over themselves if they get cold.
- Be sure to ask if touch is OK before touching. Respect and be sensitive to the boundary needs of a client. Do not touch the genital area (with men & women) or breasts (with women). Practice hands off healing for these sensitive areas.
- Do not diagnose or prescribe, and never suggest that a client alter any prescribed treatments from a licensed health care provider. Should symptoms or other health concerns come up during treatment, suggest that the client seek consultation with a qualified licensed professional (medical doctor, therapist, etc.) as soon as possible.
- Recommend careful medical monitoring if a person has a medical or psychological condition or is on any medications.
- Always work within the legal and ethical guidelines of your area and keep informed of these guidelines and regulations.
There are 15 basic hand positions in the original Usui Reiki system.
Do ALL of these hand placements for every one-on-one in-person treatment. Do not skip any hand placements unless it is totally necessary due to the person not wanting to be touched in a certain manner or due to certain injuries sustained that might otherwise aggravate those injuries.
During the treatment remember to keep the fingers and thumb of each hand together – open fingers cause the energy to scatter rather than remain focused on the area/s in question.
Talking is permitted during the treatment however a quiet relaxed state is more conducive to the healing process at hand. If the person happens to fall asleep the treatment will be even more effective since the person’s mind will not be in an analytical stage where it analyses everything that is going on.
Having accomplished ALL the following, up above, you are now ready for the treatment.
Begin a Treatment by Scanning the Aura: before you begin, hold your hands about 3 1/2 inches away from the client and move them slowly around the client’s body. Notice any sensations and/or changes in the feelings you get. As a Reiki, I, just notice the sensations and leave it at that. When you have Reiki II, you will begin to use the information more, but for now, just store it away. You will be building a “database” of sensations and ultimately the sensations, which are unique to you, will begin to reveal certain aspects of the client’s energy system and their mental, emotional, physical, and spiritual state.
- Step 1: Have the person lay face up with legs uncrossed on the sofa/bench.
- Step 2: Place a pillow under their neck for comfort and place another pillow under their knees for extra comfort.
- Step 3: Remind the person to keep their legs/feet uncrossed at all times for better receptivity of the energy that will be flowing from your hands.
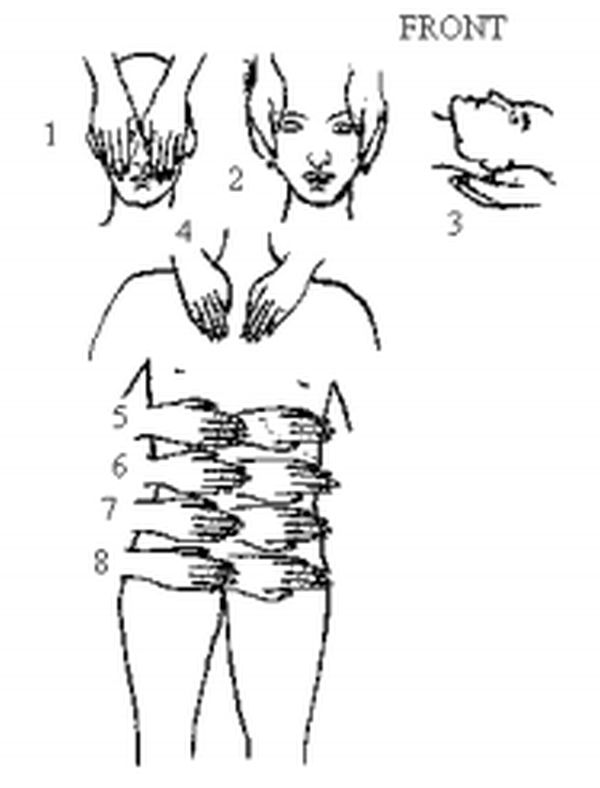
- Step 4: POSITION 1: Start at the head and standing directly at the top of where their head lays place both hands over their eyes being sure not to obstruct their breathing. Gently hold them in place between 3 minutes before moving on to the next hand placement.
- Step 5: POSITION 2: Now move your hands over the ears. Place your right hand over their right ear and your left hand over their left ear. Keep the hands in place for 3 minutes.
- Step 6: POSITION 3: Now slide the hands under their head so that the back of their headrests on your hands. Again leave them in that position for 3 minutes.
- Step 7: POSITION 4: Remove the hands from under their head and place them in a sort of VEE-shaped fashion over their collarbones. The right hand will be resting on the right upper front part of the shoulder and the left hand will be resting on the left upper front part of the shoulder. Keep the hands in place for 3 minutes.
- Step 8: POSITION 5: Now reposition yourself whereby you are either sitting alongside them to their left or to their right side. Once in place place the hands just under their chest/breast area. Place the hands so that the heel of the Right hand is on the outer side of their body closest to you while the Left one is outstretched directly in front of the Right one. They will form a straight line with the heel of one hand touching the fingertips of the other hand. Keep them in place for an additional 3 minutes before moving on to the next hand placement.
- Step 9: POSITION 6: Next move both hands down a few inches until both hands are resting on the lower rib cage. Be sure to continue to hold the hands in the same configuration that you held them in Step 9 up above. Hold them in place for 3 minutes before moving on to the next placement.
- Step 10: POSITION 7: Again, move both hands as if they were cemented together down a few more inches from where they were resting. The hands should be on or near the stomach area. Keep them in place for about 3 minutes.
- Step 11: POSITION 8: Now move the cemented hands down over the groin region and keep them there for 3 minutes.

NOW, Have the person roll over onto their belly in a comfortable position so as to not cause them any undue strain. They need to be as relaxed as possible.
- Step 12: POSITION 9: Place both hands on their shoulder blades. Again, the right hand is placed across their body with the heel of that hand being closest to you while the heel of the left hand is touching the fingertips of the right hand. Both hands, when viewed from above will appear to be cutting across the body. Once the hands are in place keep them there for 3 minutes before moving on.
- Step 13: POSITION 10: Now slide the cemented hands down a few inches so that they are on or about the lower shoulder blade area. Keep them in place for 3 minutes.
- Step 14: POSITION 11: Once again slide the hands as if they are still cemented together down a few more inches to where they are in the middle of the back. Keep in place for about 3 minutes.
- Step 15: POSITION 12: Now slide the cemented hand placement on or around the upper hip region of the lower back. Keep them in place for yet another 3 minutes.
- Step 16: POSITION 13: Slide the hands down a few more inches (remember to keep them cemented together so as to keep the same hand configuration as in the previous exercise). At this point, they should be on the hipbones. Place them there for 3 minutes before moving on.
- Step 17: POSITION 14: Now move the cemented hands down to where they are resting squarely on the buttocks region and keep them gently in place for 3 minutes.
- Step 18: POSITION 15: Finally, place one hand on the buttocks, cross-wise with the other hand (The right hand) underneath that one with fingers pointing towards the person’s head. Looking at it from up above the hand placement will give the appearance of the letter “T”. Keep them in place for an additional 3 minutes. – Right-hand underneath, Left hand on top!
Now the hand placements are complete and about 45-60 minutes may have passed.
Once You Have Worked the Standard Positions, Treat the Aura:

Once you are finished with the various standard positions and any other additional areas, hold your hands about two feet away from the client and flow Reiki into their aura for 5 minutes or so, moving slowly and gently up and down along their body. When you have Reiki II, you will activate the “distance” symbol and beam energy to the entire aura from several feet away.
Ending The Treatment, Reiki Level 1 Training
Once you are finished performing the treatment, you then intend that the treatment be completed, sealed, and offered for the highest good of the client. By sealed, I mean that the energy stays with the person and their aura is returned to a normal, less open state (when being treated the aura tends to open up). Once you have gently made these intentions, and let them go, intend that you and the client are energetically separated, clasp your hands together and brush them against each other, as though wiping off the dust. As soon as possible, wash your hands with cool water. At the end of a session, your hands will have unique sensations like tingling, heat, cold, etc. This process of ending the treatment helps to return your hands to a more “normal” state.
Checkout, Introduction To Reiki II – The Symbols